Showing posts with label Project. Show all posts
Showing posts with label Project. Show all posts
Sunday, 18 September 2016
A Pinterest Project Twins and Flowers

I'm sure you have all seen this project done on Pinterest many, many times. Well, I wanted to do this one.
I started out with an old Bentwood chair I got for $5.00 at a garage sale. I then, took jute rope and started at the top right hand corner and knotted the rope on the back. I then threaded the jute to the opposite side and wrapped it twice around the wooden back piece, took it to the other side, and so on.
Then I took miniature clothespins and pinned vintage photos on the jute rope.
Sit an ironstone bowl full of apples and you have a vignette that includes old family photos.
Speaking of photos-------
I took this pic last night as the twins were laying in the floor playing around - Kaycee on the left and Laycee on the right. They are eight months old and darling.

And then, I wanted to show you my gorgeous Angelwing Begonias that are blooming like crazy!!


Now, don't you think that is three great projects??
Enjoy!
Judy
Thursday, 8 September 2016
My Latest Project and Obsession

You may or may not have noticed that I have been collecting Butter Pats for quite some time. I have a bad habit of getting hung up on one thing and then just going overboard on collecting that item.
Well, I decided that I had plenty of butter pats and they were not out where anyone could see them when they were in the china cabinet.
So.......
On a recent visit to Fabricut Outlet (in Pryor, OK), I found this gorgeous frame with some really gaudy fabric on the inside of it for $5.00.
I instantly knew what I was going to do with it.
I covered the wood piece that was in it with a linen in a tan color.
Now, if you do something like this, with something breakable, you need to put a dab of hot blue under the linen where each little butter pat will be. This will keep the butter pat from pulling out away from the backing.
Now, don't fuss at me for gluing them down. I used hot glue and can always peel it off. Before I glued them down, I wrote down anything they had printed on the back so I will know what is what.
Some of these may not be actual butter pats, but that is what they sold them to me as.
Here we go, row by row.....


Aren't they beautiful? All of the varied colors, shapes and designs are so interesting.
The frame is 18" x 30" so it is a rather large piece. Now, I cannot wait to hang it.
Enjoy!
Judy
Sunday, 21 August 2016
Vintage Silver A Fast and Easy Project

You all know how much I love my vintage, tarnished silver! I collect a piece every chance I get.
Today's project is really quick and easy.

I started with this beautiful tarnished piece of silver. I did nothing to it except wash the dirt off of it. I then painted the inside of it with Americana Chalkboard Paint. It took two coats to cover good. This comes in small - 4 oz. - containers at your local craft store.

I then took an old silver spoon that was very ornate and slightly bent it so that it had a curve in the handle. I used E6000 glue to glue the spoon onto the silver platter. Use the glue at both ends of the spoon that connect to the platter.
At this point, I made a chalk holder. I used some old lace that was just a tad wider than the chalk and sewed up each side to form a pocket for the chalk.
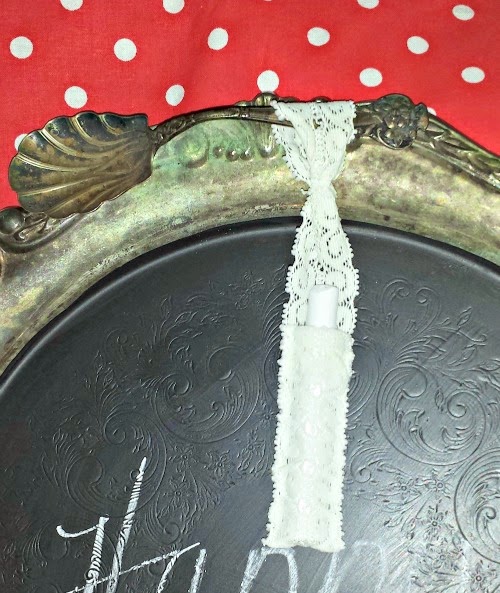
Loop the chalk holder over the curve standing up on the spoon and tied and stitch till you feel it is substantial.
Add a hanger on the back and you are done!!

A cute piece that would fit several places in your home!
Enjoy!
Judy
Monday, 8 August 2016
A Spring Project

It's been ages since we've done a project and since I know everyone is so anxious for Spring, let's do a Spring Teacup!!
Your materials needed:

Vintage Teacup
Doily
Old Lace (thin)
Moss
Spring Flowers
Ecru & Robins Egg Blue colored acrylic paint
Paint Brush
Bird's Nest
Hot Glue Gun
Tiny Easter eggs
Note: I did not use the bird's nest as originally planned because it was just too large for the teacup.

All I could find in tiny eggs were colored, so I painted them in ecru and then splattered them in blue.

Hot glue the doily with some of it hanging over the edge. Now remember, this will hang by the handle of the cup, so plan your arrangement accordingly. You want your handle at the top.
Next, add moss, small snippets of yellow flowers and some curly vine and your eggs all nestled in the cup.
I took a small strip of scrapbook paper and cut the banner and wrote Spring on it with a marker. I then folded it and hot glued it onto the cup rim.

I then took a length of vintage lace and tied thru the cup handle to make it where it would hang.
Hope you enjoy this project and it makes us dream a little of Spring and warm weather!

Don't forget to comment everyday this week for the Easter Giveaway!
Enjoy!
Judy
Sunday, 10 July 2016
A Mason Jar Banner Project

Would you like to make a new banner/bunting? With the popularity of the Mason Jars, I made one which is very simple and quick to finish.

First, find an image of the jar and trace onto a fusible interfacing. I use this one (below) because it is very heavy and stable.

I traced six jars onto the fusible interfacing and then bonded them to six pieces of fabric in the pink and green families.

Now, this sounds crazy, but it was the only way I could get the corrugated look I wanted. Take a piece of cardboard and tear off one of the outer layers to reveal the corrugated cardboard. It's not hard and you can scrape all of the little bits and pieces off.

Then, cut out your jars that are bonded and cut the corrugated cardboard into lids for the jars.
Hot glue the lids to the jars and the jars to a twill tape which is what I used. You could use ribbon, yard, baker's twine, etc.
And there you have your garland.

I tried to use fabrics that kind of looked like something you would see in a canning jar. Don't you think the green looks like pickles - maybe???
Enjoy!
Judy
Subscribe to:
Posts (Atom)